
Data Collection
Creating mUzima Forms
Data collection forms in mUzima are created by using a predefined structure with different sections entailing non-observations (e.g encounter details) and observations as shown in this mUzima form development guide.
Types of Data you can capture with mUzima Forms
mUzima Forms have ability to collect data in different data types ranging from numeric, date, coded answers (for coded concepts), text, and even media (video, images, audio) and GPS.
Single Select Questions

Media (e.g.Video, Audio)

Dates


Code Answers

Numeric

Multi-select Questions
Availing mUzima Forms to the mUzima App
Once the forms are ready for deployment, they are uploaded into OpenMRS to be available for use in mUzima. Steps include:
- Making a form definition within OpenMRS Form Management.
- Uploading the developed form against the form definition. This is done under mUzima Forms in mUzima Module with OpenMRS. This is illustrated in the form management section in mUzima User Guide 1.7.0 and mUzima User Guide 1.8.0.
- After successful upload of the form in OpenMRS, the mUzima form can be availed for data collection in mUzima by either:
(1) Including the form in the Setup Configurations – this will ensure that this mUzima Form is automatically downloaded during initial setup if that particular SetUp Configuration is selected; or
(2) Manually download of the form under Forms tab in mUzima as illustrated in Form template download video.
Using mUzima Form for Data Collection
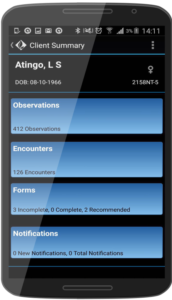
Once a form template is downloaded into the application, user can proceed with data collection by selecting Forms under Client Summary.
Using mUzima Form for Data Collection
Once a form template is downloaded into the application, user can proceed with data collection by selecting Forms under Client Summary.
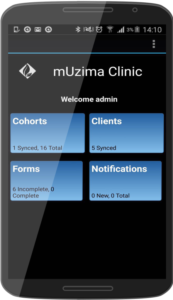
Alternatively, the user can go to the dashboard under Forms, and select the particular form to complete.
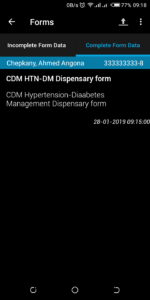
A user can save a form as draft (for completion later) or as Complete.
Uploading Form Data to OpenMRS
Data collected on Forms can be uploaded immediately to the OpenMRS server if Real Time Sync is enabled in application settings.
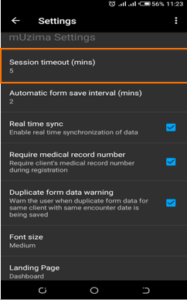
If Real time sync in disabled, the form data can be manually uploaded under Completed Form Data, within the Forms section . Real time sync is often disabled if the user wants to save their data bundles and wait until they are in a place with Wifi or other connectivity to the server.
Once form data is uploaded into OpenMRS, it goes into queue for processing by the scheduler. A scheduler is a background process that runs periodically after a given interval as shown in Scheduler Task section.
Once the Form Data (payload) is successfully processed, the data is incorporated into OpenMRS encounters and observation tables.
If the payload fails to pass the processor validations, it will be sent to the Error Queue for manual error-resolution as illustrated in Error Data section